将Github上的开源代码发布到maven中央仓库。
开源代码上传
创建项目
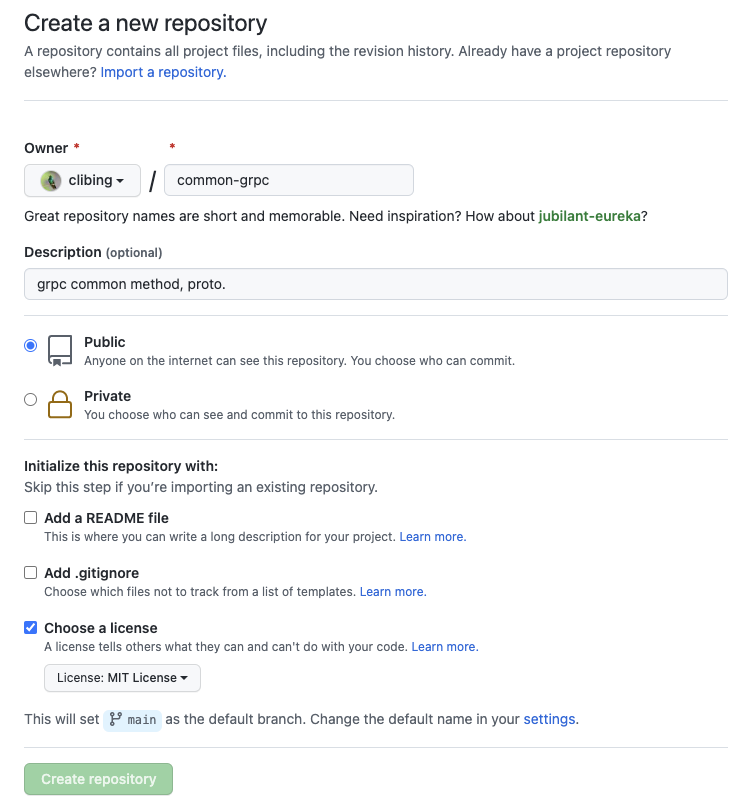
创建
在GitHub上创建一个项目名字为common-grpc,协议选择MIT

项目采用token push
登录GitHub的个人中心新增token, 快速进入, 按照提示增加token的名字,设置权限。确定后会生成一个token码
在项目中修改push的url
 1vi .git/config
 2
 3[core]
 4        repositoryformatversion = 0
 5        filemode = true
 6        bare = false
 7        logallrefupdates = true
 8        ignorecase = true
 9        precomposeunicode = true
10[remote "origin"]
11        url = https://clibing:步骤1生成的token@github.com/clibing/common-grpc.git
12       #url = https://clibing:步骤1生成的token@hub.fastgit.org/clibing/common-grpc.git hub.fastgit.org 解决国内访问慢的使用场景
13        fetch = +refs/heads/*:refs/remotes/origin/*
14[branch "master"]
15        remote = origin
16        merge = refs/heads/master
增加pom的发布配置
  1<properties>
  2        <slf4j.version>1.7.32</slf4j.version>
  3        <logback.version>1.2.10</logback.version>
  4
  5        <project.build.sourceEncoding>UTF-8</project.build.sourceEncoding>
  6        <project.reporting.outputEncoding>UTF-8</project.reporting.outputEncoding>
  7        <java.version>1.8</java.version>
  8        <maven.compiler.target>1.8</maven.compiler.target>
  9        <maven.compiler.source>1.8</maven.compiler.source>
 10</properties>
 11
 12<developers>
 13        <developer>
 14            <name>clibing</name>
 15            <email>wmsjhappy@gmail.com</email>
 16        </developer>
 17    </developers>
 18    <scm>
 19        <connection>scm:git:https://github.com/clibing/common-grpc.git</connection>
 20        <developerConnection>scm:git:https://github.com/clibing/common-grpc.git</developerConnection>
 21        <tag>master</tag>
 22        <url>https://github.com/clibing/common-grpc.git</url>
 23    </scm>
 24
 25    <licenses>
 26        <license>
 27            <name>MIT License</name>
 28            <url>https://www.opensource.org/licenses/mit-license.php</url>
 29            <distribution>repo</distribution>
 30        </license>
 31    </licenses>
 32
 33    <profiles>
 34        <profile>
 35            <id>release</id>
 36            <build>
 37                <plugins>
 38                    <!-- Source -->
 39                    <plugin>
 40                        <groupId>org.apache.maven.plugins</groupId>
 41                        <artifactId>maven-source-plugin</artifactId>
 42                        <version>3.2.1</version>
 43                        <executions>
 44                            <execution>
 45                                <phase>package</phase>
 46                                <goals>
 47                                    <goal>jar-no-fork</goal>
 48                                </goals>
 49                            </execution>
 50                        </executions>
 51                    </plugin>
 52                    <!-- Javadoc -->
 53                    <plugin>
 54                        <groupId>org.apache.maven.plugins</groupId>
 55                        <artifactId>maven-javadoc-plugin</artifactId>
 56                        <version>3.3.1</version>
 57                        <executions>
 58                            <execution>
 59                                <phase>package</phase>
 60                                <goals>
 61                                    <goal>jar</goal>
 62                                </goals>
 63                            </execution>
 64                        </executions>
 65                    </plugin>
 66                    <!-- GPG -->
 67                    <plugin>
 68                        <groupId>org.apache.maven.plugins</groupId>
 69                        <artifactId>maven-gpg-plugin</artifactId>
 70                        <version>3.0.1</version>
 71                        <executions>
 72                            <execution>
 73                                <phase>verify</phase>
 74                                <goals>
 75                                    <goal>sign</goal>
 76                                </goals>
 77                                <configuration>
 78                                    <!-- 此处配置需要从settings.xml中加载 -->
 79                                    <executable>${gpg.executable}</executable>
 80<!--                                    <homedir>${gpg.homedir}</homedir>-->
 81                                    <keyname>${gpg.keyname}</keyname>
 82                                    <passphrase>${gpg.passphrase}</passphrase>
 83                                </configuration>
 84                            </execution>
 85                        </executions>
 86
 87
 88                    </plugin>
 89                    <!--Compiler-->
 90                    <plugin>
 91                        <groupId>org.apache.maven.plugins</groupId>
 92                        <artifactId>maven-compiler-plugin</artifactId>
 93                        <version>3.8.1</version>
 94                        <configuration>
 95                            <source>1.8</source>
 96                            <target>1.8</target>
 97                            <fork>true</fork>
 98                            <verbose>true</verbose>
 99                            <encoding>UTF-8</encoding>
100                            <showWarnings>false</showWarnings>
101                        </configuration>
102                    </plugin>
103                    <!--Release-->
104                    <plugin>
105                        <groupId>org.apache.maven.plugins</groupId>
106                        <artifactId>maven-release-plugin</artifactId>
107                        <version>2.5.3</version>
108                    </plugin>
109                </plugins>
110            </build>
111
112            <distributionManagement>
113                <snapshotRepository>
114                    <id>sonatype-nexus-snapshots</id>
115                    <name>Sonatype Nexus Snapshots</name>
116                    <url>https://s01.oss.sonatype.org/content/repositories/snapshots/</url>
117                </snapshotRepository>
118                <repository>
119                    <id>sonatype-nexus-staging</id>
120                    <name>Nexus Release Repository</name>
121                    <url>https://s01.oss.sonatype.org/service/local/staging/deploy/maven2/</url>
122                </repository>
123            </distributionManagement>
124
125        </profile>
126    </profiles>
上传代码
1git add .
2git commit -m ""
3git push origin master
推荐 按照git提交规范 文本 GitHub有写好的控件
注册Sonatype的账户
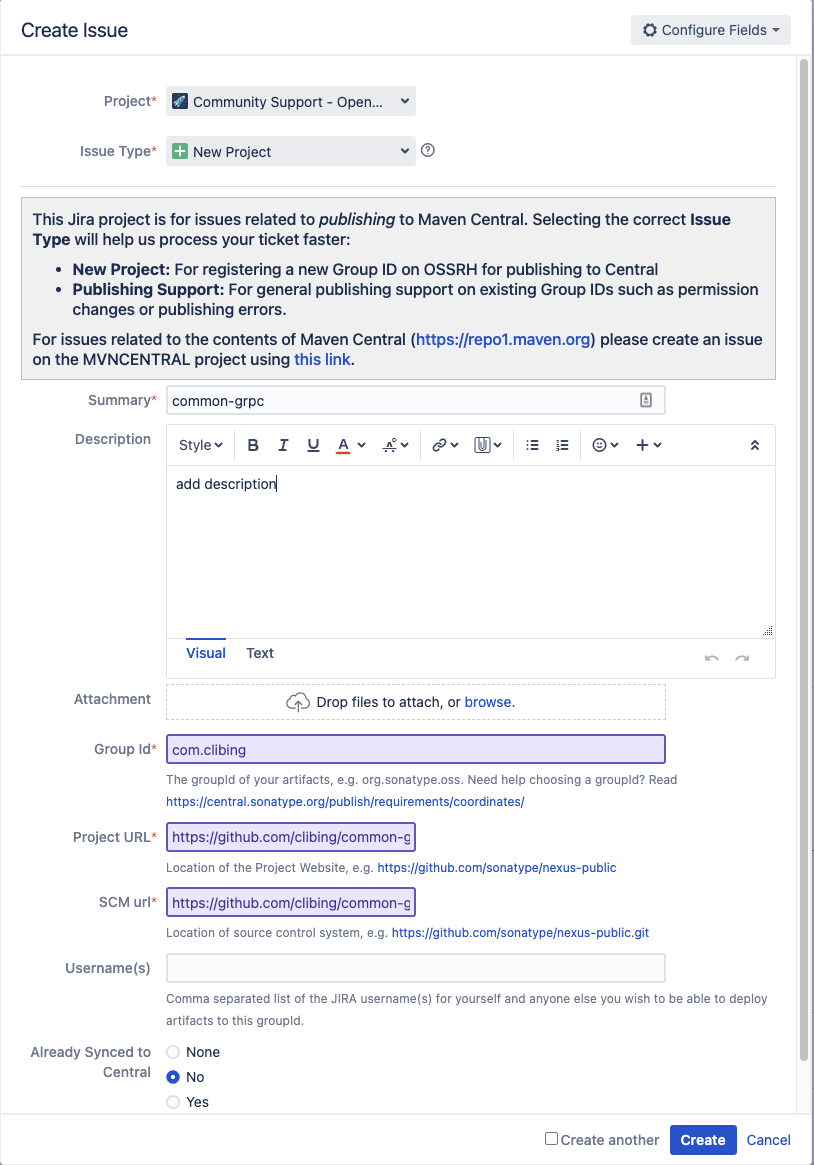
创建一个issue

提交后需要等待状态为已解决 Status:RESOLVED
如果存在异常需要在comment中提示进行处理
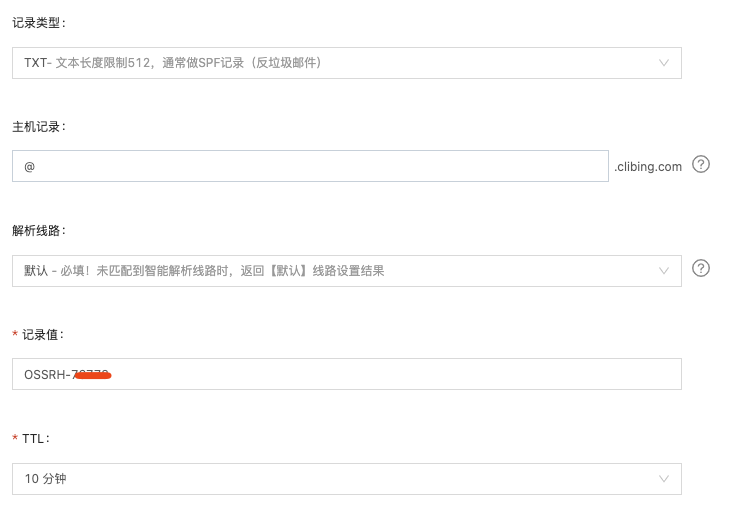
私有域名增加TXT
因为发布的jar是com.clibing需要验证dns的txt记录
1host -t txt clibing.com
输入的结果为:
clibing.com descriptive text “OSSRH-创建的编码”
如果出现问题comment会提示这个问题:
To register this Group Id you must prove ownership of the domain clibing.com. Please complete the following steps to continue:
1. Add a DNS TXT record to your domain with the text: OSSRH-76778. Please read https://central.sonatype.org/faq/how-to-set-txt-record/
2. Edit this ticket and set Status to Open.
More info: https://central.sonatype.org/publish/
If you do not own this domain, you may also choose a different Group Id that reflects your project hosting. io.github.clibing would be valid based on your Project URL. To continue the registration process, please follow these steps:
1. Create a temporary, public repository called https://github.com/clibing/OSSRH-76778 to verify github account ownership.
2. Edit this ticket, update the Group ID field with the new GroupId, and set Status to Open.
More info: https://central.sonatype.org/publish/requirements/coordinates/
我的阿里云DNS
配置如下

推送
配置settings.xml
配置仓库的发布账号和密码
在maven/conf/settings.xml中的<servers><servers>增加如下配置, 注意username为申请时注册的账号
 1  <server>
 2    <id>sonatype-nexus-snapshots</id>
 3    <username>clibing</username>
 4    <password><!-- 替换为注册时的密码,发布会使用 -->password>
 5  </server>
 6  <server>
 7    <id>sonatype-nexus-staging</id>
 8    <username>clibing</username>
 9    <password><!-- 替换为注册时的密码,发布会使用 -->password>
10  </server>
生成gpg签名
生成
1gpg --gen-key
根据提示输入 name 、email然后确认,会弹窗输入密码(非常重要,发布时会使用), 注意密码为下文中profile为gpg2中gpg.passphrase
输出的内容大概如下:
 1gpg (GnuPG) 2.2.23; Copyright (C) 2020 Free Software Foundation, Inc.
 2This is free software: you are free to change and redistribute it.
 3There is NO WARRANTY, to the extent permitted by law.
 4
 5Note: Use "gpg --full-generate-key" for a full featured key generation dialog.
 6
 7GnuPG needs to construct a user ID to identify your key.
 8
 9Real name: clibing
10Email address: wmsjhappy@gmail.com
11You selected this USER-ID:
12    "clibing <wmsjhappy@gmail.com>"
13
14Change (N)ame, (E)mail, or (O)kay/(Q)uit? O
15We need to generate a lot of random bytes. It is a good idea to perform
16some other action (type on the keyboard, move the mouse, utilize the
17disks) during the prime generation; this gives the random number
18generator a better chance to gain enough entropy.
19We need to generate a lot of random bytes. It is a good idea to perform
20some other action (type on the keyboard, move the mouse, utilize the
21disks) during the prime generation; this gives the random number
22generator a better chance to gain enough entropy.
23gpg: key 4B90762EEC6676D8 marked as ultimately trusted
24gpg: revocation certificate stored as '/Users/****/.gnupg/openpgp-revocs.d/A5314A2BB10CA*******34D14B90762EEC6676D8.rev'
25public and secret key created and signed.
26
27pub   rsa3072 2021-12-31 [SC] [expires: 2023-12-31]
28      A5314A2BB10CA*******34D14B90762EEC6676D8
29uid                      clibing <wmsjhappy@gmail.com>
30sub   rsa3072 2021-12-31 [E] [expires: 2023-12-31]
验证
 1
 2keyserver.ubuntu.com
 3pgp.mit.edu
 4subkeys.pgp.net
 5www.gpg-keyserver.de
 6
 7gpg --keyserver hkp://keyserver.ubuntu.com:11371 --send-keys  A5314A2BB10CA*******34D14B90762EEC6676D8
 8
 9or
10
11gpg --keyserver pgp.mit.edu --send-keys A5314A2BB10CA*******34D14B90762EEC6676D8
输出
1gpg: 正在发送密钥 *** 到 hkp://pgp.mit.edu
配置gpg签名密钥到settings.xml中
在maven/conf/settings.xml中的<profiles></profiles>增加如下配置
主要一下自定义的properties的可以名字,在项目的pom.xml中会使用
 1<profile>
 2      <id>gpg2</id>
 3      <activation>
 4        <!-- 默认是激活的状态,如果配置false,可以在idea中手动选择 id 为 `gpg2`的profile 激活 -->
 5        <activeByDefault>true</activeByDefault>
 6      </activation>
 7      <properties>
 8        <!-- macos gpg2 -->
 9        <gpg.executable>gpg2</gpg.executable>
10        <gpg.keyname>clibing</gpg.keyname>
11        <gpg.passphrase><!-- 需要填写生成gpg签名时输入的密码 --></gpg.passphrase>
12      </properties>
13    </profile>
使用指定的settings.xml进行发布
1mvn install deploy -P release
2
3or
4
5mvn -gs <上一步骤配置的settings.xml位置>/settings.xml install deploy -P release
仓库
当上述mvn命令执行完后, 这是在Sonatype上会存在待发布的记录
snapshot 预览
(略)
release 仓库

- 进入个人中心的左侧导航栏的Staging Repositories or https://s01.oss.sonatype.org/#welcome,这时会展示列表, 一般最后一个为刚刚发布的jar,此时的构件状态为 Open
- 选中构件,并点击上方的 Close–>Confirm 在下边的Activity选项卡中查看状态。
- 当状态变成closed后,执行 Release–>Confirm 并在下边的Activity选项卡中查看状态。
成功后构件自动删除,一小段时间(约1-2个小时)后即可同步到maven的中央仓库。届时会有邮件通知。
注意: 不允许修改和二次发布


评论